Wednesday, September 5, 2018

Revel in the Nerdiness


OK nerds, are you ready?

Last time we were talking about Quadrant Analysis and how SS MTB’s force you into all quadrants much more than say geared road bikes.  And that being the case, it provides a more well-rounded workout.   Between then and now, I’ve had a chance to get my Wahoo Elemnt Bolt up and running which has enabled a few things….first, it connects to my HR strap and my PWR meter so I can collect that data simultaneously.  Secondly, it allows me to display my power real time which then enables me to adjust my effort…all cool stuff.  (and a freaking awesome unit...garmin should be worried).
So last Friday (day before the AES Tusayan Tussle Race), I made a fast run up to Crystal Pt. which contrary to popular belief, is not a meth house…It’s our little jewel of singletrack here in Munds Park which climbs about 800ft.  Perfect for a Z5+ run and to loosen up the legs.  The entire climb is a bit over 14 minutes and is split into 2 sections, a flatter section with a few ups, then a steady grade with switchbacks to the top.  Since we looked at the QA stuff before, let’s look at the cadence distribution for a little insight…


Interesting!  The whole ride is two distinct distributions(cyan colored) and the lighter grey colored one is the steeper switchback section which is almost entirely standing pedaling (w/ a 34-19).   This I believe actually shows that in between area well which for my case is around 75 rpm (too steep to sit and mash, too easy to stand).
Now let’s look at the Tusayan Tussle file…almost 5 hours of data!  Wow, this one took a few beers to digest.  Here’s the quadrant plot…as you might expect, tons of scatter.  That race was actually fairly flat and my gearing was 34-19.  You can see from the plot that I spent over ½ the time sitting and generating power in Z2. (lower right hand quadrant and below the curved line which is 250W)(Contrast that to a Flagstaff climbing ride where over 50% of the time is spent in the upper left quadrant).


The cadence distribution on that one looks similar except the middle area is a bit more filled in.


However, if I look at the first 45 minutes or so which was flattish with a slight uphill grade you can see the familiar “bimodal” look to the distribution which again shows seated and standing cadences.  

This section btw, I was clawing my way back up from 6th place and had my eyes glued to the 5 second pwr avg trying not to let it get too high and burn all my matches. (it was very useful for that since when you see someone in front of you, you wanna close that gap fast!).
The other interesting thing to notice from that race is how my average power trended over the entire 5 hours… Below is a plot where I plotted the 1000 second average (almost a 17 minute average).  You can see that I was chasing in that first part of the race then backed off until near the end where I then could smell the beer at the finish.  This is interesting…I’d love to think with training I can keep the power consistent or maybe with at least a bit more “control” I could do so.  More thinking about this to be done…


Finally, to help address the bi-modality of the cadence data, I did some seated intervals up Waterline Rd where I targeted about 225W for durations of 5 minutes.  I’m thinking that with some work in this area, I can improve my seated power when I’m in that “in-between” area.  Here’s what the overall quadrant plot looks like with one of those 5 minute intervals selected…note how the seated pedaling interval(Green Points) has such a tight cluster(and fairly near the 250 W curve)

Now you might ask..."WTF do you do with all this you angry mofo?"... several things....
The Tusayan Tussle race was a flattish course and I was not trained very well to do it...I didn't have the endurance I should have (hence the fall-off in the power data) plus almost all my training rides are 50% or more standing and very little in the lower right quadrant.  I believe mixing in some seated intervals as I did today will help...and BTW, my legs are shredded from them....obviously a weakness I can address.
Now that I have HR data along with PWR data, it will enable me to play around with something called aerobic decoupling...which is basically a measure of aerobic fitness.  I think my lack of some longer training rides has impacted my ability to keep generating steady power late in these 4-6 hour races.
I know some of you are like, "You're wasting your time you dumb f*ck!  Just go ride your bike!"....Yeah...whatever...I've ran out of f*cks for you.
AR

Thursday, August 30, 2018

Data...My New Time Suck

Ok, so it's been a while since I've knocked back a few IPA's and sat down to the ol' blogger machine.  So, it seems about that time.  A while back I was ranting about stuff like Strava Challenges and how SS MTB's make you work corners of your fitness that a geared bike may not (unless you are really disciplined about training)(more about this below).  It's time to continue a bit on that same thread...
I've been a big fan over the last few years of less junk time in the saddle and more intensity.  It's proven to at least qualitatively move my fitness in the right direction.  I've always worn a heart rate monitor and used it to do some simple post ride analysis to understand how long I spent in given zones.  I'd always wanted some sort of power meter but being the cheap a$$ that I am, I could just never part with the dough.
Finally, PM's have come down in price and I picked up a Stages PM (crank arm based) unit.  I'm not here to argue the pro's and con's of the Stages...sure it's a one sided measurement that uses math (multiplies by 2) to get overall power.
So, here's the deal...I'm no expert at using this thing (YET) and especially using it on a SS MTB which there seems to be very little published out there....  So, if you have some great insight, well then, lay it on me!
I should also say that I don't have a "real" head unit to record the power data from the Stages PM...that'll be here tomorrow but for the last month, I've been using the Strava iPhone app which has at least allowed me to do post ride analysis....speaking of that, there is a great free application called Golden Cheetah written by a guy in the UK that is amazing for analyzing the data.
Here's what I've learned...
1.  I believe my FTP (Functional Threshold Power) to be around 265 watts...now, big disclaimer...if my left leg is 5% stronger than my right, then when you do the complex math of x2, then my overall is going to be 10% high...so, if you're like, "There's no f*cking way Angry Ray is making that kind of power"....well, you might be right.  Honestly, I don't think it's WAY off....and BTW, it's from MTB rides and some modeling that GC does...not trainer stuff and not roadie stuff...(dirt, rocks, slippery surfaces...you know...reality).
2.  Given that, my Watts/Kg is around 3.6...yes, I'm a fat Mofo...162# of fat.
3.  I've realized why SS MTBing is putting coaches out of business...  Ok, so pay attention...some smart dudes came up with a way to display data called a Quadrant Plot or Quadrant analysis.  It's basically a plot of pedal force against pedal velocity...(WTF?)....yes, so imagine this...you hit a short punchy climb on the SS, and you stand up and mash the pedals, barely turning them...LOW CADENCE, HIGH FORCE.... at the other end of the spectrum is HIGH CADENCE, LOW FORCE...that is spinning.  So now time for a plot...below is a plot (not mine) of a roadie time trial.  Note how the spread of data points looks like a shotgun blast at close range.


Now look at the Quadrant plot of my SS MTB ride where I did a bunch of climbing in Flagstaff...

My points are all over the place!  Why is that?  I've only got one f*cking gear people...when it's steep, I stand and mash...when it's not, I spin like crazy. (BTW, I've checked the data from the PM on a smooth hill and it's nice and "clean").   Now, why is that good?  Imagine for a second you have an constantly variable automatic transmission on your bike..it changes gear ratio so you always pedal at 90 rpm.  What do you think happens?  You are super strong at 90 rpm but otherwise, you are NOT!
Thus, a SS bike essentially MAKES you generate power in all quadrants of the plot since largely your power output is a function of grade (how steep) and gearing.  (Essentially the idea that you have to work both your slow-twitch (endurance) muscle fibers and your fast-twitch (sprints) and that's probably more than I'm qualified to discuss!)

Now here's what's interesting...overall on that ride, I spent almost 1/2 the time (47.4%) in the upper left quadrant (high force, low cadence)...but when I select one of the 16ish minute climbs (Weatherford), it's almost all in that quadrant(Green dots)

The other very interesting thing is where the dots are relative to the curved line.  That curved line is a constant 250 watts...dots over it are > 250W, dots under are < 250W.  So in that upper left quadrant, those green dots seem to generally be on or a little above the line whereas in the lower right quadrant (low force, high cadence), they tend to average lower.  The vertical line separating those quadrants is 59 rpm which happens to be about where I would transition from sitting to standing.  Most of the rides I've done so far with the PM tend to look like this which tells me either, 1) my seated pedaling power is low and/or 2) I tend to choose routes and gearing that force me into that upper left quadrant.
What I do at least anecdotally see, is that on some gradual, steady grades, there is a combination of grade and gear that seem very "in-between" for me... too hard to sit and mash, too easy to stand...  I think this tends to be in some of that lower right quadrant.

In any case, I'm gonna do some more experiments...probably find a long steady road of the grade where I can sit and not be spun out so I can verify if my ability to apply around 250 watts in the 60-90 rpm range is weak or if it's simply been a result of what I've been riding.  If truly that area is a weakness for me, then I can actually choose routes and gearing that force me to do work in that area... that's cool!  ah....inner-engineer is satisfied....

There's just so much more to learn with this thing...with a proper head unit, I'll be able to capture HR and learn some cool stuff about the relationship between HR and Power.

More to come!

Friday, March 23, 2018

Trashing a Tire in the Interest of Science


Having been mountain biking for the last 7 years or so in the sharp, thorny environment of AZ, I’ve certainly experienced my share of punctures, slices, and other issues.  Most of us are aware of the concept of plugging a tire using the commercially available product called “tire bacon”.  It’s basically a scaled down version of what people have been using to plug holes in car tires for quite some time.

I have actually never used tire bacon..matter of fact, I have lost the 2 Genuine Innovation tire bacon kits that I’ve bought due to somehow bouncing out of my jersey pocket.  I have however, stuffed other things into a sidewall hole to take up space and allow the sealant to fill the remaining yet smaller spaces.  Those things being a small piece of cloth (like t-shirt material) and even a stick.
However, I decided to try some other materials that are cheap and easily obtained.  Those being, strips of an old inner tube, cotton string, and strips of an old mouse pad.

It just so turns out that I’ve been putting off changing out an old Maxxis Ikon so before doing so, I decided it’s final gasp would be donating it’s tread and sidewalls to science…  I decided that I would see how the above materials filled a cut between about 0.15” and 0.2” since anything larger, you’d probably be either tubing or pulling out the sewing kit.  Punctures up to about 0.2 are great candidates for plugs.

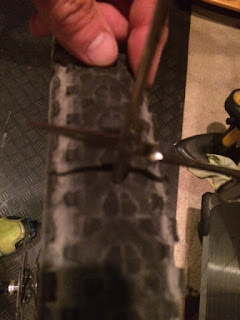
So I took a small pair of sharp scissors and jabbed it in the tread as you see below.  I did this again a few inches away as well.  I then pushed in a strip of mouse pad material(neoprene covered with cloth) in one hole, and a strip of inner tube in the other hole.  I used a small flat bladed screwdriver to do this but in the case of the inner tube, I used a small allen key since the screwdriver just punctured the tube material.


Small flat bladed screwdriver used to push in the plug
I aired up the tire to 30 psi and after just a little sealant weapage, both sealed up well.
I repeated the process but this time in the sidewall where I punctured 3 slices, oriented radially and stuffed in a slice of inner tube in one, a slice of mouse pad in another, and a piece of cotton string in another. 


Aired the tire back up and all 3 held air.  I sprayed them all with some windex and none showed any signs of leakage.
No bubbles coming from any of the plugs

I then pulled the tire and what I noticed is that it seems like the sealant gathered around the mouse pad strip and the cotton string but not so much on the strip of inner tube (because it’s butyl rubber perhaps and not too much likes to stick to it).
Obviously, I did not go out and ride the tire to see which would stay in the best but would venture a guess that the cotton string and mouse pad strip would have the best chance.  So, bottom line, if you don’t have tire bacon around, any absorbent material would work, but I found the cotton string and mouse pad material held up to the poking device used (flat bladed screwdriver) the best.

Angry Ray’s MTB Hacks and Other Ideas


OK, so the Schilling Blog Machine has been a busy one and it’s time for me to catch up a bit.  Sure I’ve done some cool rides and could talk about that, but I’ll leave that to later…what I wanna talk about now is HACKS…and other ideas that will a) save money for which you can buy more beer and b) enable you to fix your bike trailside (so you can get back to your car quicker to drink beer).

Being a fairly creative and “thrifty” engineer, I love DIY ways to accomplish things.  Additionally, finding things that solve a problem that is otherwise not obvious is pretty cool to me…so here you go…a dump of what I think are some good ideas…

Chain Measurement
Our drivetrains here in the desert take a ton of abuse due to the dusty conditions.  Wearout is a given and lots of folks have come up with tools to measure chain wear (stretch, but such a poor term).  Here’s how I do it…first, I have several chains that I rotate through the SS bikes I have.  When I’m trying to see where a chain is in terms of wear, I put them on the ground in a circle as shown…smaller the diameter, the more the wear.  I’ve found at about 22” diameter, I will start to have chain derailing on the SS.  Then it’s time to put that chain in the “art” bin for a future project.


Fix it stuff and how to carry
I love the idea of repurposing worn out stuff.  It keeps it out of landfills and that just seems like a good thing to do.  Recently I lost a small kit of tire fix it stuff that I had in a zip lock baggie.  What I realized was that a zip lock is slippery against my jersey…and I needed something with a bit more friction that wouldn’t work its way out.  So I took an old MTB tube and sewed up a simple pouch.  You see below that the pouch contains many necessary items like a multi-tool, mini-leatherman, quick links, valve cores, cleat bolts, ibuprofen, etc…  Works awesome and stays put.


Tire plugging
I’m sure most of us have tried to plug a tire that was punctured on the trail.  Tire bacon works great, but I’ve found almost anything you stuff in the hole that is a tight fit and can absorb some sealant will work.  Heck, I’ve even used a stick and was able to ride back out to my vehicle before.  In the pic below are several items plus a simple poker tool made from a needle and cork. 

Cotton string, strips of old tube, strips of mouse pad

Chain tool
Sometimes a quick link can be undone by hand, but the right tool makes it super easy.  Park makes one which is fine, but if you have a spare set of needle nose pliers, just bend the tips slightly inward and boom, you’ve got a cheap set of quick link pliers.


Cheap Velcro
I can’t imagine where we would be without Velcro…Harbor Freight sells a package of Velcro straps for cheap…I’ve used these for so many things from securing a waterbottle, securing a battery pack, etc…  stick a few of these in your kit and I’ve sure you’ll find a need for them.

Mouse Pads
Mouse pads made from neoprene rubber have a number of great uses…cut them into strips for tire plugs, cut out rectangles to go between your light battery and your frame,etc…

Single speed spacers
Having 3 SS bikes, different cog brands, and several wheel sets creates a bit of a an issue when trying to change a cog for a ride and being sure the chainline is right.  I do a couple things…first, standardize as much as possible on a given cog brand…then, keep track of the spacing between the cog and the inside lip of the freehub.  Then use that as a reference when changing.  If you have a bunch of spacers like I do, I zip tie a set together with the cog so I can quickly change w/o measuring.


Good value brake pads
I love stuff that has value.  TruckerCo semi-metallic pads bought off of ebay in 4-packs are like $25 total…they work and work well.

Syringes
Plastic syringes are an important part of maintaining your bike.  If you’ve ever bled brakes, a dropper post, or added sealant to tires, you’ve probably used them.  They are INCREDIBLY cheap off of ebay.  The larger one below cost me less than a few bucks and with the small included tip glued on, I can directly inject sealant into tires…super quick and easy.  The smaller one will actually thread right into a bleed port on a Xloc and enable you to easily bleed your fork lockout or dropper lockout. 

Super Glue
Super glue is another indispensable item…get the big pack from Harbor Freight.  Put some on the toilet seat before your buddy sits down.

Ok, so there you go...a few of my ideas and hacks that have served me well.

Sunday, February 11, 2018

The "Because Schilling takes forever to blog"....blog

Yep, you got it...Mr. Schilling's TAT (Turn around time) to blog about his rad adventures is just too long...so I've taken it upon myself to do so...plus it ups my blog count and I'm gonna bury that chump in blog numbers...
This is the cool bike from George Harris that John borrowed for this ride... it's in front of the BCT where he's taken about a billion pics...  

This is a dirt road...in case you didn't know...

This is an old gas pump that has been repurposed to dispense Bud Lite Lime...mmm, John loves that stuff when he does big rides....

Thursday, February 8, 2018

# ┌∩┐= 0

OK boys and girls, time for a good ol’ fashion rant…

While doing my usual mix of activities (work, beer drinking, bike riding, reading about bikes, shopping for bike stuff, blogging, bike art, etc), I realized that many of us (including me at times) spend TONS of energy trying to eek out more speed on my bike.  We all read about carbon this or that to drop weight, new tires, training methods, blah blah…

What I realized is that the # of f*cks I was giving to things that had very little influence on my riding speed had creeped north of ZERO.  And that many of my riding buddies, and the conversations we were having centered around these same, somewhat insignificant things…

What are they you ask?

#1: Tires…  Arguing about tires is about as close to conversational masturbation as it gets.  Ask 10 people what their favorite tire is and you’ll get at least 5 different answers (even for a given terrain!).  Granted, you can’t compare a Walmart tire to a $75 race tire or to a downhill specific tire, but arguing that a high quality Maxxis XC tire is faster or slower than a high quality Bontrager or Specialized XC tire is just plain dumb.  (I’m sorry, those rolling resistance tests published are OK, but don’t tell the whole story) We all know people out there that are absolutely killing it on tires we’ve kicked to the curb saying that “traction was poor” or “it washed out in a turn”…    Guess what, it’s not the tire that sucks…it’s your technique.  Work on it, over and over and over…when you can get that worn out front tire to hold you in turns on kitty litter, you’ve got $hit down…

#2: Boost…  OK people, listen, I’m a mechanical engineer…I understand things like forces, stiffness/compliance, angles, etc….   But when did a small amount of additional lateral wheel stiffness make me measurably faster?  Nope…  If you can find a good, statistically valid study that proves the lateral stiffness that boost spacing provides makes me cover ground faster, I will sell all my non-boost crap and drink the Koolaide.  Till then, I will watch boost empty peoples wallets faster while the value of their non-boost components goes to hell... 

So, take that time you spend at the computer writing emails to buddies arguing about tires and boost and whatever else, and go f*cking ride your bike…ride it fast to the point of near puke….ride no more than 1x per week at Browns Ranch to practice momentum conservation and cornering, ride rocky stuff to practice sketchy handling…ride with faster people to push you...just be sure to ride and don't blame life for getting in the way.  Yeah, sometimes it REALLY does, but each time you think it does, i'll bet at least half the time you can come up with a plan that still gets you on the bike.  

THAT's the #1 thing that will make you faster.

If you’re getting in only 4 hours a week on the bike and spending that or more surfing the internet reading bike related stuff looking for things to make you faster, you’re doing it WRONG.


AR.

Thursday, January 11, 2018

Glues, Spooges and $hit like that…

So as MTBrs, we’re undoubtedly going to run across times when we need to glue something together… could be our favorite pair of MTB shoes to get a few extra miles out of before replacing, could be a slice in a tire sidewall, could be our frame that we got welded and are now stranded out in some remote place (Looking at you Schilling).
What I’ve noticed as I’ve talked with many of you reading this, is that you choose a substance that may not really be the best thing…I mean lets face it, we have ready access to stuff like JB Weld, Shoe Goo, Super Glue, lots of 2 part epoxies, silicone, etc…But, they are all made for VERY different purposes.  So this little blog write-up is to hopefully add some logic based on my experience but also my mechanical engineering know-how from working with some of these things in my past life.

Shoe goo
Shoe goo is amazing stuff, rubber in a tube that gets you really high (note: use in a well ventilated space) but gets mistakenly used as a bonding agent.  It is NOT.  I would highly discourage using the stuff to bond two things together since that is NOT what it was designed to do.  It really doesn’t have great bond strength.  It’s basically a wear surface to replace worn off parts of your shoe.  Sticks great to rubber, but not so much to other highly flexible parts of your shoe (like the uppers).  I have applied this to the underside of my mtb shoes WHEN THEY ARE NEW to lengthen the HAB life of them.  Below is a pic of two of my pairs, both of which are at least 3 years old, the Shimano’s having been HAB’d up Mingus 2x and been through the AZT300.   Obviously, you have to clean the surfaces to which you apply it and it will tend to flow so you can’t lay it on too thick.  But, the stuff is great when used for what it is intended.
Great for parties and making your shoes last longer

I put on Shoe Goo on these SIDI's when they were almost new and have not worn through the toe yet....still going strong.  I'm sure the socket head cap screws used as toe spikes helped too.

Another view of the SIDI's... note that that it doesn't stick to the leather very well due to the flexing

These are those Shimano M089's that have been to hell and back..again, I put the stuff on early in their life...well before the toe area got too worn down.

Here again, note how the shoe goo does not stick to the uppers very well.

Superglue
Superglue has a ton of uses for MTBing….keeping skin stuck together, gluing your buddies ass to the toilet seat, etc… lol…Superglue is obviously a GLUE(duh)…a bonding agent (Cyanoacrylate).  They work when the stuff you are bonding is fairly rigid AND the bond line is THIN.  They don’t fill gaps very well.  Below you’ll see a pic of a pair of my somewhat new Shimano’s that have an inherent design flaw where the sole next to the cleat delaminates.  This happened the same way in the pair I discussed earlier that has been through tons of HAB.  The solution (which works EXTREMELY well) is to use some superglue (the cheap stuff from Harbor Frieght), let it wick into the joint, but then clamp it with some spring clamps to keep the bond line tight.  If you were to try and fix these with shoe goo or some other flexible adhesive, you would probably have issues.  Where superglue falls down is when the surfaces flex a lot, ie, tire sidewall slices.  However, some manufacturers have formulated more robust cyanoacrylates (gorilla glue) that can flex.  Personally, I have not tried these.  Hutchinson has a tubeless tire patch kit (that they are quite proud of) that has a specially formulated superglue for bonding rubber…
I'm a fan of the cheap stuff at Harbor Freight...used correctly, it works great

Note the slightly darker area right of the cleat...that's the superglue where I bonded down that sole ridge.

Using a spring clamp to keep it tight
This shoe was glued EXACTLY like above very early in its life...it never failed after bonding it with cheap a$$ Harbor Freight Super Glue


2-Part Expoxies
There are of course a ton of these ranging from quick cure ones to not so quick.  Things like JB Weld are 2-part epoxies.  Typically these cure very rigid but also have great bond strength with metals, plastics and carbon (stuff we find on bikes).   Below is are a couple of pics where I used it to repair a set of carbon bar ends that after multiple crashes, had worn through the carbon.  They are definitely not made for flexible materials.  I did end up fixing a set of saddle rails with it, but in the end did not use it since I had a replacement.  I’m pretty confident it would have worked fine.
My cheap Chinertown carbon bar end that started to crack from too many diggers

5 bucks worth of 5 min epoxy...works great...get it at HD.

Silicone
Silicone actually has more uses than just to seal bathtubs and make boobs bigger…I have had great luck using it to repair cut tires.  For example, we all have cut a sidewall at some point and later get it home and patch the inside.  Sometimes, the cut is barely through the sidewall or even the patch we use might be “just” big enough.  I will take pure silicone, and smear it on the inside of the tire over and beyond the patch or over the cut.  It adheres quite well to the inside of tires and when it sets up, will not extrude itself through the cut or puncture in the tire.  Obviously, it’s not a very robust wear material so if you put it on the outside of the tire, it won’t last too long. 

No, not this kind of silcone ya bunch of perverts


So, there you have it…a quick brain dump on glues and such.  I’m positive I don’t know everything about this, and you all have info to add.  But, hopefully this helps a few folks buy the right spooge for their need.

Saturday, January 6, 2018

Trail 4, Like having a Baby

Well, first, I don’t know what it’s actually like to have a baby, but based on experience being there and the comments made like, “That hurt like f*ck, I’m never doing that again!”, I have to imagine it’s not a terribly fun experience…But then a few years later, the memories of passing a bowling ball sized tiny human through your crotch seem to go away and they want to do it all over again.  The right response to such silliness is of course, “Wait honey, you said it hurt like hell the first time…and you want to do this all over again why?”
And that’s what Trail 4 is like…A solid shit show from start to finish...bowling ball sized rocks...10.5 miles of rugged, rocky, sharp, brutal desert terrain that makes you work for every mile…  After you do it once and say things like, “I’m never doing that again!”…a few years later, perhaps lured by the possibility of adventure and backcountry shenanigans, you’re ready to try it again…

Note here that there are no pictures of bikers...should have been a warning
That my friends brings me to today’s little adventure…Yes, this blog is not about Strava bashing, zone this or intensity that, but an honest to God blog about an epic ride (shocking, I know).
It all started a few weeks ago when Justin and myself did a little ride where we rode the newly completed Maricopa trail between the Bronco TH and Bartlett Lake Rd.  After that ride, I started thinking about better loop options and thought, “Hey, if you go up Trail 4 from Spur Cross, through 7 Springs, pick up the Maricopa trail, it would be about a 40 mile loop from Cave Creek.  No biggie right?  How hard can 40 miles be?

Well, after bailing this morning on some other ride options(Sorry Mark!), I decided it was time for a little solo adventure, a  vision quest of sorts….so I loaded up a gpx file on the etrex and got after it…Started a few minutes after 9AM from FTBS in Cave Creek and headed north.  Weather was perfect, a tad chilly and a nice thin cloud cover to keep the temps in check.  Up through spur cross; stopped to pay my $3 at the entry to the park and asked the lady, "anyone come through hiking Tr4?"  She looked at me like, "Hell no man, no sane person goes up there".   Perfect...off I went passing some huge groups of hikers out for a nice 1/2 jaunt then like you would expect, the trail gets teeth quick after the first climb away from the creek.  
This is actually a good section of trail...still not rideable

These signs are scattered along the 10 or so mile stretch...just to mock you.

From there, it’s a constant cactus dodging, rock hoping, HAB up, HAB down for at least the next 9 or so miles.  I really can’t say I’ve HAB’d that much in quite some time…truly a Schillingsworth type of route.  In all this suck ass trail, I will say that the views are spectacular, its incredibly quiet, and all in all a pretty cool experience (to walk beside your bike).  Honestly, it was quite enjoyable!...I was in no hurry, no strava KOM's harmed, just enjoying a nice HAB....
Lots of water up there

Flowing water right here...neato.

beautiful scenery

more water...would have been nice to soak my feet.

Some rideable trail!  actually this section was REALLY cool and very much not desert-like!

Old fashioned Ride-Over gate...need skillz to ride over this one.
Finally, I emerged near the 7 springs campground where there is still quite a bit of water flowing (which is amazing considering our lack of rain or snow).  
waterfall
On down to the Bronco TH where the new section of the Maricopa trail ties in.  Here the trail follows the powerline access road but they reworked much of it. 
 
new bridge on the Maricopa Trail
It takes a turn upward and eastward to go through a valley climbing towards Kentuck Mountain before topping out.  This is where the suck really started to get me...the trail in this section is SOFT...like oatmeal...a slight uphill is a HAB...  Finally, I got to the top.

View from the Highpoint...let the brake smoking begin!

Then the scree slide begins…basically a 1300 ft descent to Blue Wash (with a few stinger climbs tossed in there).  The final grunt up out of Blue wash and an easy roll back into Cave Creek…
It was quite an adventure…after all the “training” and other intensity nonsense, I was due for a good ol’ fashioned adventure…and this one delivers!


AR